Kubernetes Deployment, StatefulSet, and DaemonSet resources
Kubernetes Deployment, StatefulSet, and DaemonSet resources
Deployment, StatefulSet, and DaemonSet are all Kubernetes resources that help manage the lifecycle of Pods running in a cluster, but they differ in their use cases and behavior.
Deployment:
- A Deployment is used to manage stateless applications. It provides declarative updates for Pods and ReplicaSets.
- It is typically used to manage applications that can scale horizontally.
- When updating a Deployment, Kubernetes creates a new ReplicaSet and gradually scales it up while scaling down the old ReplicaSet.
- Deployments do not guarantee stable, unique network identities or ordered, persistent storage. If a Pod is deleted or replaced, its identity is lost and it may be replaced with a new Pod at a different IP address.
StatefulSet:
- A StatefulSet is used to manage stateful applications, where each Pod has a unique identity and requires persistent storage.
- It provides guarantees about the ordering and uniqueness of Pods, as well as stable network identities.
- When updating a StatefulSet, Kubernetes updates one Pod at a time in a sequential order. This ensures that the identity and network address of each Pod is preserved across updates.
- StatefulSets can be used to manage stateful applications that require ordered scaling or rolling updates.
DaemonSet:
- A DaemonSet ensures that a copy of a Pod is running on every node in a cluster. It is typically used for system-level services, such as log collection, monitoring, or network proxies.
- DaemonSets provide a way to run a single instance of a Pod on every node in a cluster, and they automatically add or remove Pods as nodes are added or removed.
- DaemonSets do not provide rolling updates or scaling, since they are designed to run a single instance of a Pod on every node.
- In summary, Deployments are used to manage stateless applications, StatefulSets are used to manage stateful applications, and DaemonSets are used to manage system-level services that require one instance of a Pod on every node.
Each resource has its own unique characteristics and use cases, and choosing the right one depends on the specific needs of your application or service.
CKA Exam Practice Series - 2
CKA Exam Practice Series - 2
Q2 Scale down
There are two Pods named db-0 and db-1 in Namespace project. management asked you to scale the Pods down to one replica to save resources.
Answer
You can scale down the replicas of the db Pods in the project Namespace by using the kubectl scale command with the --replicas flag set to the desired number of replicas (in this case, one).
Here's an example command to scale down the db Pods:
kubectl scale --replicas=1 deployment/db -n project
This command scales down the deployment named db in the project Namespace to one replica. The deployment resource is used here because it is the resource that manages the replica set for the db Pods.
Note that if the db Pods were created using a StatefulSet or a ReplicaSet instead of a Deployment, the command would be slightly different. For example, to scale down a StatefulSet named db to one replica, you would run:
kubectl scale --replicas=1 statefulset/db -n project
After running this command, the number of replicas for the db Pods will be reduced to one. If the Pods were previously running on different nodes, the one remaining Pod will be randomly assigned to one of those nodes.
The example yaml of statefulset will be like below:
apiVersion: apps/v1
kind: StatefulSet
metadata:
  name: db
  namespace: project
spec:
  replicas: 2
  selector:
    matchLabels:
      app: db
  serviceName: db
  template:
    metadata:
      labels:
        app: db
    spec:
      containers:
      - name: db-container
        image: mysql:5.7
        ports:
        - containerPort: 3306
          name: db
        env:
        - name: MYSQL_ROOT_PASSWORD
          value: "password"
        volumeMounts:
        - name: db-storage
          mountPath: /var/lib/mysql
  volumeClaimTemplates:
  - metadata:
      name: db-storage
    spec:
      accessModes: [ "ReadWriteOnce" ]
      resources:
        requests:
          storage: 1Gi
To scale down the replicas of this StatefulSet to one, you can use the kubectl scale command as shown in my previous answer:
kubectl scale --replicas=1 statefulset/db -n project
Note that when scaling down a StatefulSet, Kubernetes will terminate the Pods in reverse order. In this case, the second Pod (db-1) will be terminated first, and then the first Pod (db-0) will be terminated. This ensures that the StatefulSet maintains its ordered identity.
CKA Exam Practice Series - 1
CKA Exam Practice Series
Q1 Create a single pod
Create a single Pod of image httpd:2.4.41-alpine in Namespace default. The Pod should be named pod1 and the container should be named pod1-container. This Pod should only be scheduled on a master node, do not add new labels any nodes.
Answer
To create a single Pod named pod1 with a container named pod1-container using the image httpd:2.4.41-alpine that is scheduled only on a master node in the default namespace, first, it's easy to acreate a template by runnning dry-run
kubectl run pod1 --image=httpd:2.4.41-alpine --dry-run=client -o yaml > q1_tmpl.yaml
Then you can add the followings in the template yaml manifest:
vi q1_tmpl.yaml
apiVersion: v1
kind: Pod
metadata:
  name: pod1
  namespace: default
spec:
  containers:
  - name: pod1-container                # Change
    image: httpd:2.4.41-alpine
  tolerations:                          # Add
  - key: node-role.kubernetes.io/master # Add
    effect: NoSchedule                  # Add
  nodeSelector:                         # Add
    node-role.kubernetes.io/master: ""  # Add
The tolerations field specifies a key and an effect. The key is set to node-role.kubernetes.io/master, which matches the taint applied to master nodes, and the effect is set to NoSchedule, which allows the Pod to be scheduled on the master node despite the taint.
In a Kubernetes cluster, a toleration is used to allow a Pod to be scheduled on a node that has a taint. A taint is a label on a node that repels Pods that do not tolerate it. By default, the master node in a Kubernetes cluster has a taint applied to it with the key node-role.kubernetes.io/master and the effect NoSchedule. This taint is applied to prevent regular Pods from being scheduled on the master node, which is reserved for system-level tasks.
In order to schedule a Pod on the master node, you need to add a toleration to the Pod's spec that matches the key and effect of the taint applied to the master node. The tolerations field in a Pod's spec is an array of tolerations, each of which specifies a key and an effect.
To find the tolerations for a Pod, you can use the kubectl describe pod command. For example, to get the tolerations for a Pod named my-pod, you can run:
kubectl describe pod my-pod
This command will display detailed information about the Pod, including the tolerations that have been added to it.
To find the tolerations for a node, you can use the kubectl describe node command. For example, to get the tolerations for a node named my-node, you can run:
kubectl describe node my-node
This command will display detailed information about the node, including the taints that have been applied to it and the tolerations that have been added to it.
It's worth noting that while you can schedule regular Pods on a master node using tolerations, it is generally not recommended to do so, as it can interfere with the proper functioning of the Kubernetes control plane that runs on the master node.
To complete this question however, creating a pod on the master node, you can run;
kubectl apply -f q1_tmpl.yaml
This command will create the Pod with the specified name, container, image, toleration, and nodeSelector in the default namespace.
Common Kubernetes Resources
Kubernetes resources are the building blocks of a Kubernetes cluster. They represent the various components and configurations that make up the infrastructure for running containerized applications.
Here are some of the most common Kubernetes resources:
Pods
A pod is the smallest deployable unit in Kubernetes. It is a logical host for one or more containers and provides a shared network namespace and storage volumes. Pods can be used to run a single container or a group of tightly-coupled containers that need to be co-located on the same host.
Certainly, here are some references for further reading on each Kubernetes resource I mentioned:
Services
A Service is an abstraction layer that provides a stable IP address and DNS name for a set of pods. Services are used to enable communication between different parts of an application, both within and outside of the cluster. They can be used for load balancing, internal or external access, and other purposes.
Deployments
A Deployment is a higher-level resource that manages the creation and scaling of pods. It provides a declarative way to define the desired state of the application and ensure that the actual state matches the desired state. Deployments can also perform rolling updates and rollbacks, making it easy to deploy new versions of an application.
ConfigMaps
A ConfigMap is a Kubernetes resource used to store configuration data in key-value pairs. ConfigMaps can be used to decouple configuration data from the application code, making it easier to manage and update. They can also be used to store data that is needed by multiple pods or containers.
Secrets
A Secret is a Kubernetes resource used to store sensitive data, such as passwords or API keys, in an encrypted form. Secrets can be used to decouple sensitive data from the application code and ensure that it is securely stored and transmitted. They can also be used to provide secure access to external services or APIs.
StatefulSets
A StatefulSet is a Kubernetes resource used to manage stateful applications, such as databases or other services that require stable network identities and persistent storage. StatefulSets provide a way to ensure that pods are created and scaled in a specific order and that each pod has a unique hostname and stable network identity.
DaemonSets
A DaemonSet is a Kubernetes resource used to manage background services that need to run on all or some nodes in a cluster. DaemonSets ensure that a specific set of pods is running on all nodes or on a subset of nodes in the cluster.
Jobs
A Job is a Kubernetes resource used to manage batch jobs or other workloads that run to completion. Jobs provide a way to run a specific task or set of tasks to completion, and then terminate.
CronJobs
A CronJob is a Kubernetes resource used to schedule recurring jobs at a specific time or interval. CronJobs provide a way to automate repetitive tasks, such as backups or data processing, and can be used to reduce the amount of manual intervention needed to manage applications.
Ingress
An Ingress is a Kubernetes resource used to manage external access to a set of services in a cluster. Ingress provides a way to expose services to external clients and route traffic based on URL or host name.
Conclusion
Kubernetes is a powerful container orchestration platform that provides a rich set of tools and features for deploying, scaling, and managing containerized applications. Its resources, such as Pods, Services, Deployments, ConfigMaps, and Secrets, form the building blocks of a Kubernetes cluster and enable developers to easily manage and scale their applications. By leveraging Kubernetes resources, developers can create scalable and resilient containerized applications that can be easily deployed and managed in production.
Kubernetes Basics and How to Start Learning
Kubernetes Basics and How to Start Learning
Kubernetes is a powerful open-source container orchestration platform that has become the standard for managing containerized applications in cloud-native environments. If you're new to Kubernetes, it can seem overwhelming at first. However, with the right resources and a willingness to learn, anyone can become proficient in Kubernetes.
What is Kubernetes?
At its core, Kubernetes is designed to automate the deployment, scaling, and management of containerized applications. It provides a platform for deploying, scaling, and managing containerized workloads across multiple hosts and clusters, abstracting away the underlying infrastructure and providing a uniform way to manage applications regardless of where they are running.
The key building block of Kubernetes is the pod. A pod is the smallest deployable unit in Kubernetes and represents a single instance of a container. Pods are grouped together in deployments, which define the desired state of a set of pods and manage their lifecycle.
Kubernetes uses a declarative model, meaning that administrators define the desired state of the system and Kubernetes takes care of the details of making it happen. This means that instead of manually configuring each component of the system, administrators can simply declare what they want the system to look like, and Kubernetes will make it so.
Kubernetes also provides a powerful set of features for managing the networking, storage, and security of containerized applications. For example, Kubernetes provides a built-in service discovery mechanism that allows containers to find each other and communicate, even across multiple hosts and clusters.
How to Start Learning Kubernetes
Learning Kubernetes can seem daunting, but there are many resources available to help you get started. Here are a few examples:
Official Kubernetes Documentation The official Kubernetes documentation is an excellent resource for learning Kubernetes. It provides a comprehensive guide to the platform, including detailed information on installation, configuration, and usage. You can find it here: https://kubernetes.io/docs/home/
Kubernetes Bootcamp The Kubernetes Bootcamp is a free, self-paced online course that provides an introduction to Kubernetes. It covers the basics of Kubernetes, including deployment, scaling, and management. You can find it here: https://kubernetesbootcamp.github.io/kubernetes-bootcamp/
Kubernetes the Hard Way Kubernetes the Hard Way is a free, hands-on tutorial that walks you through the process of setting up a Kubernetes cluster from scratch. It's designed to help you gain a deep understanding of how Kubernetes works under the hood. You can find it here: https://github.com/kelseyhightower/kubernetes-the-hard-way
Kubernetes Fundamentals (Pluralsight) Kubernetes Fundamentals is a paid online course from Pluralsight that provides a comprehensive introduction to Kubernetes. It covers topics like deployment, scaling, and networking in depth. You can find it here: https://www.pluralsight.com/courses/kubernetes-fundamentals
Kubernetes Community Slack The Kubernetes Community Slack is a great resource for getting help and advice from other Kubernetes users. You can join the Slack channel here: https://kubernetes.slack.com/join/shared_invite/zt-h6d30gb6-7X9UHbzcCZBMyisZ62Nf2Q#/
Synthetic Monitoring: Improving User Experience through Automated Testing
Synthetic Monitoring: Improving User Experience through Automated Testing
In today's fast-paced digital world, businesses are increasingly relying on websites, applications, and IT systems to connect with customers and drive growth. As a result, it is more important than ever to ensure that these systems are performing at their best, providing a seamless and reliable user experience. Synthetic monitoring is a method of monitoring the performance and availability of these systems that is becoming increasingly popular due to its proactive approach and the insights it provides into the user experience.
What is Synthetic Monitoring?
Synthetic monitoring involves using automated scripts or simulated transactions to monitor the performance and availability of websites, applications, and IT systems. Unlike traditional monitoring methods that rely solely on real user data, synthetic monitoring allows organizations to proactively detect and diagnose issues before they impact real users. Synthetic monitoring tools simulate user behavior, such as navigating through a website or making a purchase, and monitor the response time, availability, and functionality of the system.
Why is Synthetic Monitoring Important?
Synthetic monitoring is important because it provides a proactive approach to monitoring the performance and availability of websites, applications, and IT systems. By simulating user behavior, organizations can identify potential issues before they impact real users, reducing downtime and improving the overall user experience. Synthetic monitoring can also help organizations to:
- Ensure consistent performance: Synthetic monitoring allows organizations to monitor the performance of their systems on a continuous basis, ensuring that they are meeting performance goals and delivering a consistent user experience.
- Improve availability: By proactively monitoring the availability of their systems, organizations can reduce downtime and ensure that their systems are always accessible to users.
- Diagnose issues quickly: Synthetic monitoring tools provide detailed insights into system performance, allowing organizations to quickly diagnose issues and resolve them before they impact real users.
- Optimize user experience: By monitoring the user experience, synthetic monitoring tools can help organizations to identify areas for improvement and optimize their systems to deliver a better user experience.
- Synthetic Monitoring Tools
There are many synthetic monitoring tools available in the market, ranging from commercial solutions to open source tools. Some of the popular commercial solutions include New Relic Synthetics, Dynatrace Synthetic Monitoring, and Pingdom. These tools provide real-time monitoring and alerts for websites and applications, allowing organizations to proactively detect and diagnose issues.
For organizations with limited budgets or those that want to try synthetic monitoring before investing in a commercial solution, there are open source tools available as well. Apache JMeter, Gatling, and Tsung are a few examples of open source synthetic monitoring tools that offer a cost-effective way to get started with synthetic monitoring.
Conclusion
Synthetic monitoring is a powerful tool for monitoring the performance and availability of websites, applications, and IT systems. By simulating user behavior and monitoring the response time, availability, and functionality of systems, organizations can proactively detect and diagnose issues before they impact real users. Synthetic monitoring allows organizations to ensure consistent performance, improve availability, diagnose issues quickly, and optimize the user experience. Whether you choose a commercial solution or an open source tool, synthetic monitoring is a critical component of any organization's IT monitoring strategy.
MS-SQL HA database backup using Powershell and Ansible, Step by Step - 3 -
Installing & Setting up Ansible on Linux server (ubuntu 18.04)
Ansible installation on Linux:
1. Get a Linux machine (ubuntu 18.4 server) from your environment. (Here we used Azure's VM.)
2. Login to the deployed Linux server using SSH and run the following commands to install Ansible.
Update apt-get and install python
 sudo apt-get update

 sudo apt-get upgrade -y

 sudo apt-get install python -y
Update Ansible repo & install Ansible
sudo apt-add-repository ppa:ansible/ansible

sudo apt-get update

sudo  apt-get install ansible -y
3. Configure SSH (optional for Linux managed nodes)
For this instruction, this is an out of scope but in case you need a Linux managed node that is running automation, you have to do these steps.
Configure SSH
ssh-keygen

Key file's path and an ssh passphrase will be asked like above. Store them in a secure place.
Copy SSH public key
cat <your ssh key file's path>.pub
e.g.

Copy the public key shown above, and store it somewhere.
Login to your Linux managed node.
Issue the command
sudo -s
Open the authorized_key file with the following command
sudo vi ~/.ssh/authorized_keys (Past the public key that you got previous step, and write & quit.)
The authorized_keys should be same as the publick key you have created previously.
Now you can test SSH between them.
sudo ssh <ansible host username>@<ansible managed host server name>
4. Create an Ansible inventory hosts file on the Ansible server
sudo vi /etc/ansible/hosts
Edit hosts like below format:
[winserver]
<your windows server FQDN>

[winserver:vars]
snaible_winrm_port=5986
ansible_connection=winrm
ansible_winrm_transport=credssp
ansible_winrm_server_cert_validation=ignore
5. Create an Ansible play-book yml
sudo vi sqlAutobackup.yml
Edit sqlAutobackup.yml like below:
- name: Powershell for ms-sql database backup
  hosts : winserver
  gather_facts: false

  vars:
   ansible_user: "<your winrm username for ansible server>"
   ansible_password: "<password>"

  tasks:
   - win_command: powershell.exe
     args:
      stdin: <your powershell script path in the remote windows host>
User name and password are the ones that you have created in this step:
3. Create an service account for Ansible
MS-SQL HA database backup using Powershell and Ansible, Step by Step - 2 - - Gonzablogstdin's powershell script should be the one you have created in this step:
Run the below script to back up all sql database on this host.
MS-SQL HA database backup using Powershell and Ansible, Step by Step - 1 - - GonzablogIn this example, a plain text is used for the password and the username, which is, of course, not secure (although only root user can see it). This should be encrypted by the ansilbe vault or other key vault services. I will post how to do it at a later date!
6. Test run
Try to run the sql database backup playbook from Ansible server:
sudo ansible-playbook ~/sqlAutobackup.yml -vvvv
Note: -vvvv is a debug mode switch.
You will the outputs something like this:
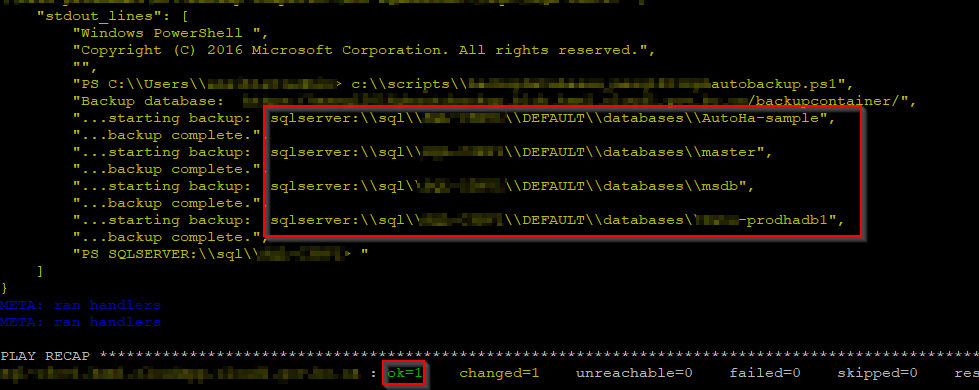
In debug mode outputs, you should see all databases like red box above, and "PLAY RECAP" should show "ok=1".
7. Set up a Cron entry for an schedule backup
To set up an schedule backup, add an entry to Ansible user's crontab.
sudo crontab -u <your winrm username for ansible server> -e
The below entry will backup sql databases in every 6 hours:
#Run ansible playbook under the user "ansible-winrm user".
0 */6 * * * sudo ansible-playbook /home/<ansible-winrm user>/sqlAutobackup.yml
"wq!" to save the crontab.
Wait and see if this schedule yml will backup as expected.
--END
References:
How to install Ansible on Ubuntu Server 18.04 - TechRepublic
Setting up a Windows Host — Ansible Documentation