MS-SQL HA database backup using Powershell and Ansible, Step by Step - 2 -
Setting up WinRM
Unlike the integration with Linux or UNIX like servers and Ansible, Windows machines cannot use SSH for Ansible integration, just yet(*1) . Thus, you will have to use Windows Remote Manager (WinRM) , instead.
1. Install WinRM Memory Hotfix on Windows server
Run the following PowerShell script to install the hotfix:
$url = "https://raw.githubusercontent.com/jborean93/ansible-windows/master/scripts/Install-WMF3Hotfix.ps1"
$file = "$env:temp\Install-WMF3Hotfix.ps1"

(New-Object -TypeName System.Net.WebClient).DownloadFile($url, $file)
powershell.exe -ExecutionPolicy ByPass -File $file -Verbose
2. Configure WinRM
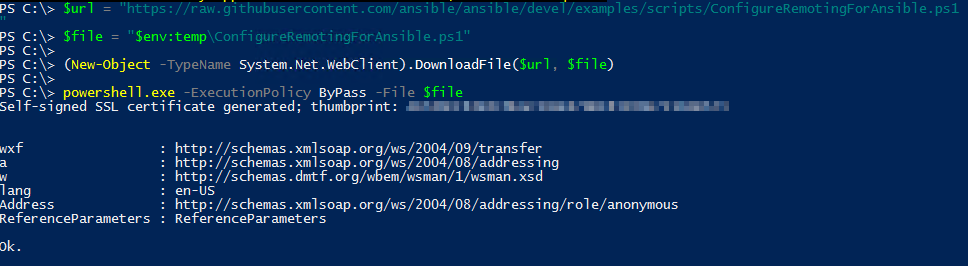
Run the following PowerShell script to setup WinRM HTTP/HTTPS listeners with a self-signed certs and the basic authentication.
$url = "https://raw.githubusercontent.com/ansible/ansible/devel/examples/scripts/ConfigureRemotingForAnsible.ps1"
$file = "$env:temp\ConfigureRemotingForAnsible.ps1"

(New-Object -TypeName System.Net.WebClient).DownloadFile($url, $file)

powershell.exe -ExecutionPolicy ByPass -File $file
e.g.
Now, check WinRM's status:
winrm enumerate winrm/config/Listener
e.g.
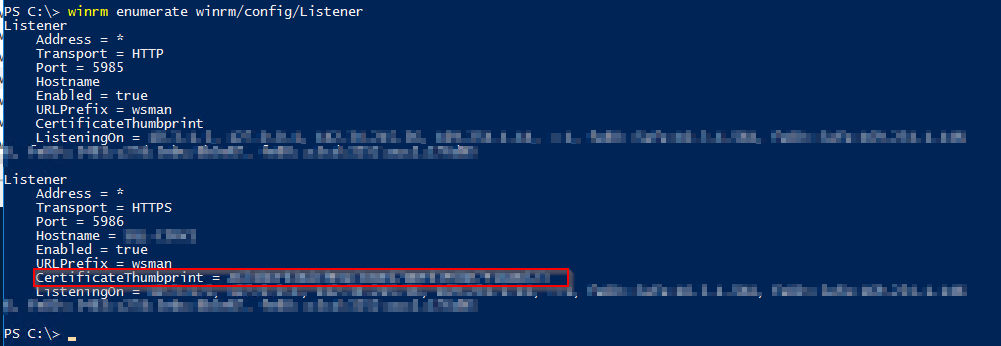
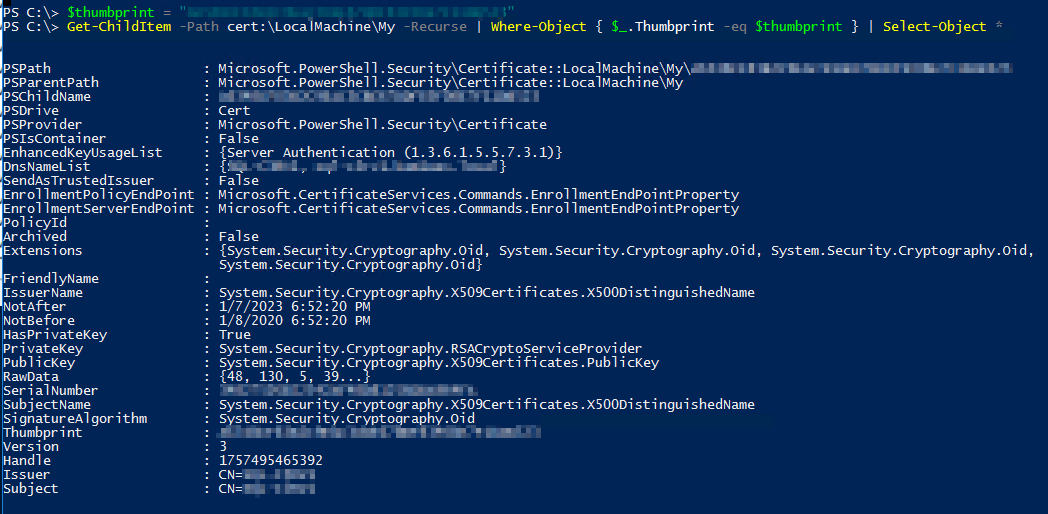
Take note of the CertificateThumbprint (red rectangle above), and run below getting the details of the certificate:
$thumbprint = "<your certificateThumbprint>"
Get-ChildItem -Path cert:\LocalMachine\My -Recurse | Where-Object { $_.Thumbprint -eq $thumbprint } | Select-Object *
e.g.
To check the current WinRM service configuration, run the following commands:
winrm get winrm/config/Service
winrm get winrm/config/Winrs
3. Create an service account for Ansible
To connect Windows machine, set up a service account for Ansible access.
Add user:
net user <username> <password> /add
Add the created user to the Administrator group:
net localgroup administrators <username> /add
e.g.

4. Add the created user to MS-SQL server's sysadmin.
Login to the Windows machine and launch up MS SQL Server Management Studio:
Navigate toSecurity > Logins, right click and New login.
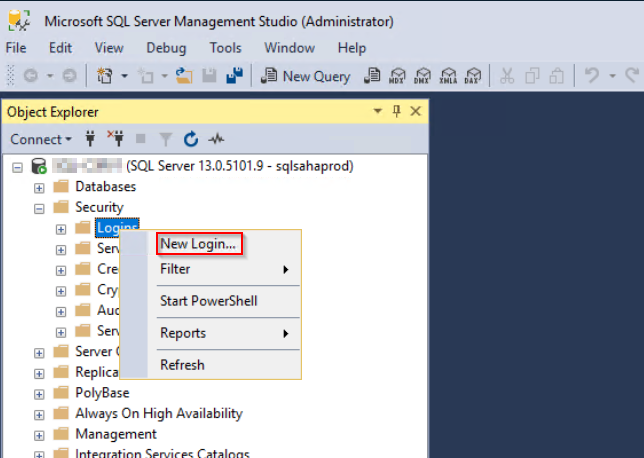
Enter user name that has been created in the previous step:
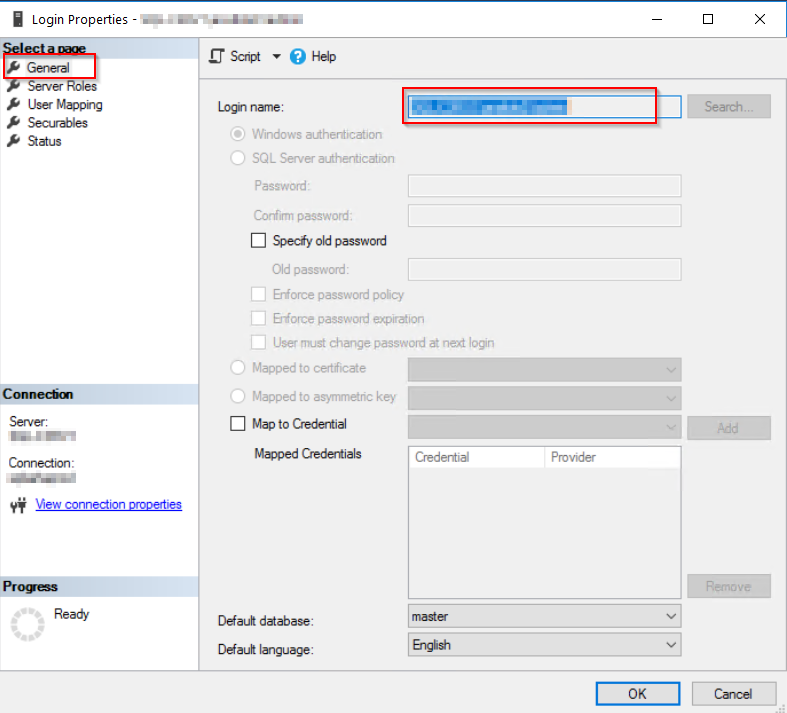
Set Check sysadmin.
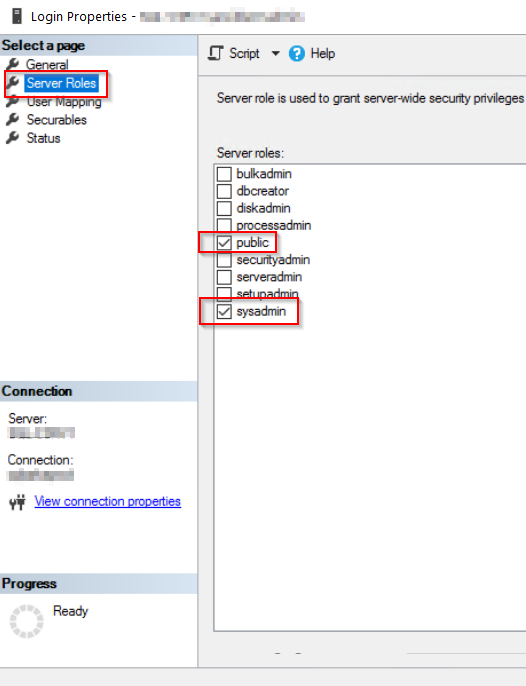
Check if SQL connection below

Click OK to close, and log off from MSSMS.
Note: if you don't like to give a database sa permission to the ansible user, modify the permission as required. (This particular user should be visible to the all databases under this SQL host server as it will search and backup them all. )
5. Test HTTP/HTTPS connection
- These tests can be done on the localhost or a remote host that WinRM ports(5985/5986) is opened.
- Username and password are the ones you have created at the step 3.
- Testing's Windows server name will be the "Issure Name" of certificate (CN field value of certificate's details ) .
HTTP test
winrs -r:http://<Windows server hostname>:5985/wsman -u:<username> -p:<password> ipconfig
HTTPS test
winrs -r:https://<Windows server hostname>:5986/wsman -u:<username> -p:<password> -ssl ipconfig
Note: This HTTPS test will fail if the certs is not verifiable.
e.g.

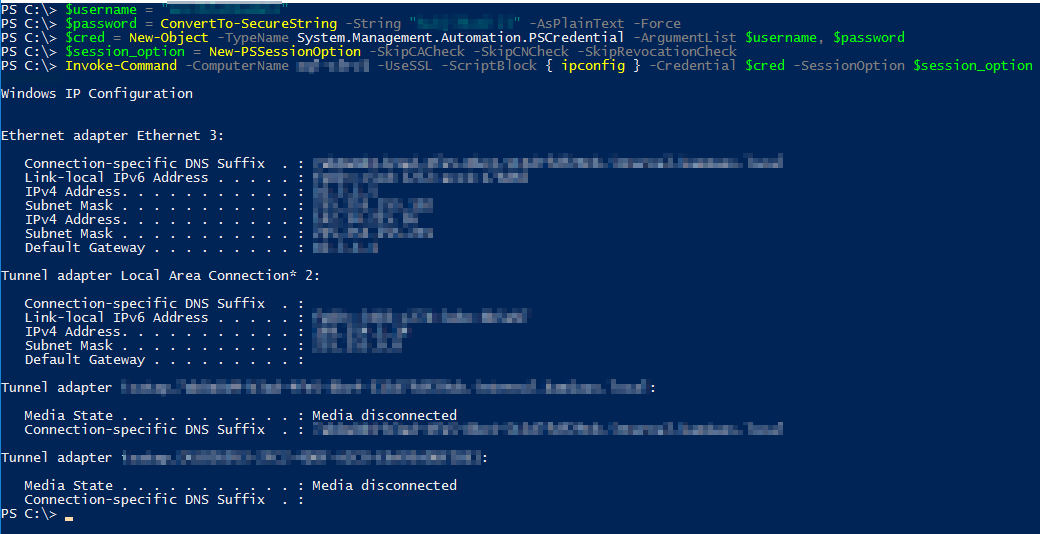
If you get that error, setup below: HTTPStest, ignoring certificate verification
$username = "<username>"
$password = ConvertTo-SecureString -String "<password>" -AsPlainText -Force
$cred = New-Object -TypeName System.Management.Automation.PSCredential -ArgumentList $username, $password

$session_option = New-PSSessionOption -SkipCACheck -SkipCNCheck -SkipRevocationCheck
Invoke-Command -ComputerName <Windows server hostname> -UseSSL -ScriptBlock { ipconfig } -Credential $cred -SessionOption $session_option
e.g.
Reference
Setting up a Windows Host — Ansible Documentation
How to install Ansible on Ubuntu Server 18.04 - TechRepublic
experimental SSH connection for Windows managed nodes (*1) Looks like there is an experimental SSH integration for Windows servers. But do it at your own risk :)
To be continued... (Next would be steps on the Ansilbe server.)
MS-SQL HA database backup using Powershell and Ansible, Step by Step - 1 -
Backgaroud :
Currently Azure Stack HUB's MS-SQL HA deployment uisng the sql-2016-alwayson ARM template is not supporting the automated backup which is otherwise supported for MS-SQL standalone database as discribed below.
This works only for the standalone deployment so that you will have to get some other ways to backup your HA databases.
Reference:
Built-in support for SQL Server Always On :

#Autmated Backup is not supported on this matrix.
Solution summary:
MS support recommended (we opned the support call for this) us to use 3rd party backup tools to backup HA databases, such as NetBackup. That's the one way of doing it. But here, we have implemented like below:
- Set up a powershell script to backup all databases in the MS-SQL HA.
- Run the powershell script using Ansible.
# Backup location we uses is Azure Stack's blob storage.
Storage account & Powershell Backup script:
1. Create a blob storage within the Azure Stack HUB and get a storage account Key.
From the Azure Stack HUB user portal, navigate to "Dashborad > Resource groups > <Your Resource group>"
Click "+ Add"

Add a new "Storage Account" for an SQL backup.

Enter a storage account name and other fields as required, and click "Review + Create"

Create a new blob container.
Navigate to "Dashborad > Resource groups > <Your Resource group> > <your storage account name> - Blobs", and click "+ Container".

Check the newly created storage account and get a Access Key infomation.
Navigate to "Dashborad > Resource groups > <Your Resource group> > <your storage account name> ".
And select "Access keys" and keep your storage accout name and its key.

Also check "properties" and get your "PRIMARY BLOB SERVICE ENDPOINT".

2. Create an SQL credential on all instances of SQL Server.
On the SQL server host, launch Windows powerShell ISE. And run the script below:
#==========
#Create cred:
#==========
# load the sqlps module
import-module sqlps
# set parameters
$sqlPath = "sqlserver:\sql\$($env:COMPUTERNAME)"
$storageAccount = "<your storage accout name>"
$storageKey = "<your storage accout key>"
$secureString = ConvertTo-SecureString $storageKey -AsPlainText -Force
$credentialName = "BackupCredential-$(Get-Random)"
Write-Host "Generate credential: " $credentialName
#cd to sql server and get instances
cd $sqlPath
$instances = Get-ChildItem
#loop through instances and create a SQL credential, output any errors
foreach ($instance in $instances) {
try {
$path = "$($sqlPath)\$($instance.DisplayName)\credentials"
New-SqlCredential -Name $credentialName -Identity $storageAccount -Secret $secureString -Path $path -ea Stop | Out-Null
Write-Host "...generated credential $($path)\$($credentialName)." }
catch { Write-Host $_.Exception.Message } }
This script will generate a Backup credential like below:

Keep this "BackupCredential-xxxxx" credential.
Next, run the below script to back up all sql database on this host.
#==========
#Run backup
#==========
import-module sqlps
$sqlPath = "sqlserver:\sql\$($env:COMPUTERNAME)"
$storageAccount = "<your storage accout name>"
$blobContainer = "<your container name>"
$backupUrlContainer = "https://<primary endpoint URL>/$blobContainer/"
$credentialName = "BackupCredential-<backup cred number>"
Write-Host "Backup database: " $backupUrlContainer
cd $sqlPath
$instances = Get-ChildItem
#loop through instances and backup all databases (excluding tempdb and model)
foreach ($instance in $instances) {
$path = "$($sqlPath)\$($instance.DisplayName)\databases"
$databases = Get-ChildItem -Force -Path $path | Where-object {$_.name -ne "tempdb" -and $_.name -ne "model"}
foreach ($database in $databases) {
try {
$databasePath = "$($path)\$($database.Name)"
Write-Host "...starting backup: " $databasePath
Backup-SqlDatabase -Database $database.Name -Path $path -BackupContainer $backupUrlContainer -SqlCredential $credentialName -Compression On
Write-Host "...backup complete." }
catch { Write-Host $_.Exception.Message } } }
This script will backup all databases except "tempdb" and "model" databsaes.
After running the script, check if all sql databases have been saved to the blob storage.

# The scripts that we have run are essentially followed the scripts in this article. Recommend to read this reference for details.
To be continued. (Next would be an WinRM for Ansilbe integration)
Nagios XI WMI agent-less monitoring for Azure Stack HUB Windows Virtual Machine, Step by Step.
It was a bit struggle to set up an WMI agentless monitoring for Windows VMs in Microsoft Azure Stack HUB (MASH) , so here is the memo I've been through.
-System environment
Monitoring Server: Linux VM in MASH (Ubuntu 18.01.1)
Monitoring Server Size: Standard DS2 v2 (2 vcpus, 7 GB memory)
Moniroting Software: Nagios XI (5.6.9)
Monitored Server: Windows VM in MASH (Windows 2019 DC)
Monitored Server Size: Standard DS2 v2 (2 vcpus, 7 GB memory)
Notes:
1. To simplify the network environment, They are in the same IP subnet and there is no dedicated FWs in between other than Netwrok Security Group (NSG) setting for each Virtual Machines which is provided by MASH, and Windows firewall on the Windows VM. (Later steps shows how to set them up.)
2. You shoud try the below reference documnet first, and see if Nagios XI's WMI agentless monitoring works in your envioroment. If it doesn't work, try my steps.
Reference document:
https://assets.nagios.com/downloads/nagiosxi/docs/Monitoring-Windows-Using-WMI-and-Nagios-XI.pdf
3. Maybe you can consider to set up an agent based monitoring, such as NCPA, if these WMI monitoring settings didn't work for you.
- Nagios XI WMI agent-less monitoring set up -
-- On WIndows Virtual Machine:
1. Create an WMI service accout.
net user <service account name> <password> /add
e.g.
net user wmiagent wmiaget /add
# ! You shoud use more complex pw in yours, of course!
2. Adding Remote Activation Priviladge to WIndows DCOM.
Start > Run > DCOMcnfg.exe

Navigate "Component Service > Computers and properties of My Computer".
And Select "COM Security > Edit Item" under the "Launch and Activation Permissions".

Add the created user "wmiagent".

Select these permissions below for the user "wmiagent".

And click "OK" to save.
3. Adding Remote WMI Access.
Start > RUN > WMImgmt.msc

Right click on "WMI Control (Local)" and select "Properties".
And Select Security Tab > CIMV2 and click "Security".

Click "Add...." button and add "wmiagent". Then select the follwoing permissions below for wmi user.

Click OK to save.
4. Windows Firewall settings
Server Manager > Tools > Windows Firewall with Advanced Security
Select "Inbound Rules" > "Filter by Group" and select " Filter by Windows Management Instrumentation (WMI)".

Make sure these two inbound rules are enabled like below:

5. Set WMI user to the "Performance Log Users" Group
Server Manager > Tools > Computer Management
Add the user "wmiagent" to the "Performance Log Users Group" like below:

Click OK to save.
6. Set Additional Permissions
On the Windows machine, Check SID for the WMI user account (wmiagent) by running the following command;
wmic useraccount where name='wmiagent' get sid
The output will be something like this:
SID
S-1-5-21-xxxxxxxx-xxxxxxxxx-xxxxxxxxx-xxxx
Keep this SID somewhere, and check the current security descriptor (SD) for SCMANAGER.
sc sdshow SCMANAGER
The output will be like this:
D:(A;;CC;;;AU)(A;;CCLCRPRC;;;IU)(A;;CCLCRPRC;;;SU)(A;;CCLCRPWPRC;;;SY)(A;;KA;;;BA)(A;;CC;;;AC)(A;;CC;;;S-1-15-3-xxxx-528118966-xxxxxxxxxx-xxxxxxxxx-xxxxxxxxxx-xxxxxxxxxx-xxxxxxxxxx-xxxxxxxxx-xxxxxxxxxx)S:(AU;FA;KA;;;WD)(AU;OIIOFA;GA;;;WD)
You need to add an entry to the SD that contains your SID,
(A;;CCLCRPRC;;;<SID>)
For example using the SID above:
(A;;CCLCRPRC;;; S-1-5-21-xxxxxxxx-xxxxxxxxx-xxxxxxxxx-xxxx)
This needs to be inserted to the beginning of the SD after the D:, using the example above it looks like:
sc sdset SCMANAGER D:(A;;CCLCRPRC;;;S-1-5-21-xxxxxxxx-xxxxxxxxx-xxxxxxxxx-xxxx)(A;;CC;;;AU)(A;;CCLCRPRC;;;IU)(A;;CCLCRPRC;;;SU)(A;;CCLCRPWPRC;;;SY)(A;;KA;;;BA)(A;;CC;;;AC)(A;;CC;;;S-1-15-3-xxxx-528118966-xxxxxxxxxx-xxxxxxxxx-xxxxxxxxxx-xxxxxxxxxx-xxxxxxxxxx-xxxxxxxxx-xxxxxxxxxx)S:(AU;FA;KA;;;WD)(AU;OIIOFA;GA;;;WD)
Run 'sc sdshow SCMANAGER' again to check the new SD has been set.
7. Set Fixed WMI Port (135 and 24158)
Since Azure Stack HUB's NSG allows connection through its port specification, WMI which uses dynamic ports by default have to be changed to the fixed port setting.
On the Windows machine, run the following command (from admin CMD);
winmgmt -standalonehost
Restart WMI service:
net stop winmgmt
net start winmgmt
Set a firewall rule for the fixed WMI port:
netsh firewall add portopening TCP 24158 WMIFixedPort
Check if Fixed port is set on the windows machine (Optional)
On the Windows DCOM console, navigate to " Computers > My Computer > DCOM Config > Windows Management & Instrumentation"
And check its properties:

You should see the "Use static endpoint" is selected and shows "24158" as a default port number.
Note: You will have to set up a new NSG rule for the fixed WMI ports (135 and 24158 both) for both Virtual Machines in Azure Stack HUB.
Ref: https://support.quest.com/kb/114559/how-to-set-a-static-fixed-wmi-port-in-windows
https://docs.microsoft.com/en-us/windows/win32/wmisdk/setting-up-a-fixed-port-for-wmi
-- On Nagios XI server:
1. Set up hosts for WMI monitored servers.
sudo vi /etc/hosts
Add host's entries of monitoring target hosts using below format:
.
.
# WMI monitoring
<IP Address> <FQDN> <hostname>
Write and quit (wq!) from the vi.
Check if wmic command can now reached to wmi monitoring hosts or not:
CPU check using FQDN:
$ /usr/local/nagios/libexec/check_wmi_plus.pl -H <target's FQDN> -u 'wmiagent' -p '<PW>' -m checkcpu -w '60' -c '70'
OK (Sample Period 74 sec) - Average CPU Utilisation 0.30%|'Avg CPU Utilisation'=0.30%;60;70;
CPU check using IP address:
$ /usr/local/nagios/libexec/check_wmi_plus.pl -H <target host's IP> -u 'wmiagent' -p '<PW>' -m checkcpu -w '60' -c '70'
OK (Sample Period 1 sec) - Average CPU Utilisation 2.15%|'Avg CPU Utilisation'=2.15%;60;70;
2. Set up Authentication file for WMI auth.
Create an authentication file (as a hidden file):
sudo vi /usr/local/nagios/etc/.wmi_auth
username=wmiagent
password=<PW>
Write and Quit (wq!) from the vi.
Check auth file's current permission. (It's 644 and belong to root group.)
$ sudo ls -ltr /usr/local/nagios/etc/.wmi_auth
-rw-r--r-- 1 root root 38 Jan 3 14:47 /usr/local/nagios/etc/.wmi_auth
Change its mode from 644 to 640 and set it to "nagios" group so that only users belong to nagios group can read:
$ sudo chmod 640 /usr/local/nagios/etc/.wmi_auth
$ sudo chgrp nagios /usr/local/nagios/etc/.wmi_auth
Check if both have been changed:
$ ls -ltr /usr/local/nagios/etc/.wmi_auth
-rw-r----- 1 root nagios 38 Jan 3 14:47 /usr/local/nagios/etc/.wmi_auth
-- On Nagios XI Web GUI:
Set up WMI monitoring using Auth file.
Navigate to "Configure > Configuration Wizards".

...and select Windows WMI wizard:

Enter FQDN or IP address of your target host and specify the Auth file you've created.

Also increase the Trancate output Length to 65536.
Set up discovered monitors as required.

Note: MASH doesn't allow ICMPs' traffic as of now (2020 Jan) so the ICMP ping monitor won't work (always shows as an unreachable alert). So here, it shoud be checked off like above. To monitor node's up/down, maybe the other ping monitors, such as telnet, URL check or other port monitoring check would be considered.
Change intervals and notifications as required.


Click Finish to save.
Check if now Naigos XI is polling setup monitors:

-- Trouble shooting:

If you see this kind of message on the Nagios Xi Web Console, run below:
Check if a state file exists under the /tmp on Nagios xi server:
$ sudo ls -ltr /tmp/*.state
-rw-rw-r-- 1 nagiosxi01admin nagiosxi01admin 202 Jan 3 15:26 /tmp/cwpss_checkcpu__xxxxxxxxxx___.state
Remove all state files:
$ sudo rm -f /tmp/*.state
Check it again, and should see this message:
$ sudo ls -ltr /tmp/*.state
ls: cannot access '/tmp/*.state': No such file or directory
Check if there is no more "UNKNOWN - Permission denied when trying to store the state data." message on the Nagios XI.
--End